Space Marine Turn 3
On the third turn, the Space Marines got the last of their reservers, a 5-man Ultramarine combat squad with a missile launcher. The squad with the Lascannon remained stationary to fire at the Hive Tyrant in the trenches, but to no effect. The rest of the Space Marines moved forward to close in on the bridge. The two Space Wolf units again had difficulty with the terrain blocking the road and didn't make it very far, though the unit on their far left was now in position to fire their two plasma guns at the Hive Tyrant and Tyrant Guard. The proceeded to do so, but only managed to kill one of their own plasma gunners.

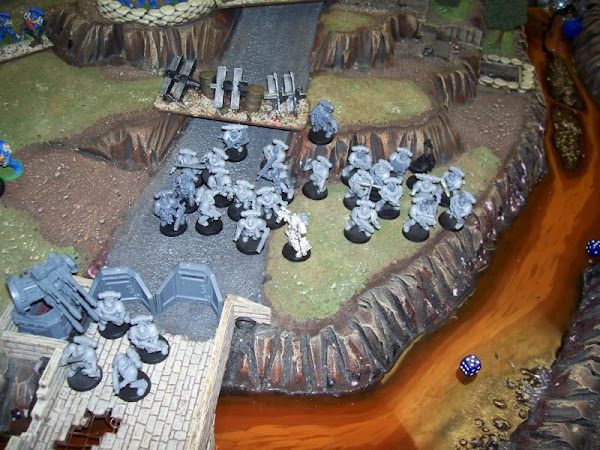
The Terminators fired on the hormaguants just on the other side of the bridge. They went to ground behind the defensive barricades, and only a few were killed. But this still left the bridge completely unoccupied, with the Space Marines closing in. In the assault phase, the Ultramarine combat squad closest to the bridge assaulted the automated quad-autocannon, blowing it to pieces with their krak grenades. Not pictured, the Lone Wolf once again manged to not inflict the final wound on the Carnifex he was battling. The Carnifex managed to wound the Lone Wolf, but due to him having the Eternal Warrior rule (for some unknown reason), he would fight on.

Tyranid Turn 3
On the far Tyranid left, the Gargoyles flew as quickly as possible towards the middle of the table, hoping to make it near the main bridge in time to help defend it. The Genestealers behind them moved forward to the edge of the trench line, with very little hope of making to the bridge in time to make a difference. The flying Hive Tyrant finished off the last of the Space Wovles he was fighting easily.

In the middle of the table, not much happened. The Hormagaunts had gone to ground, so they couldn't move. And they were blocking off the close combat Carnifex from advancing up toward the bridge, as well as keeping the Genestealers in the bastion from coming out. The Hive Tyrant didn't want to risk coming out of his extremely effective cover, so the Tyranids could do nothing but stare at the unoccupied bridge as the combined Space Marine force advanced on it.

In the assault phase, the Lone Wolf dramaticaly finished off the Carnifex, finally ending thier tense close combat battle amongst the ruins of a bombed out building.

Space Marine Turn 4
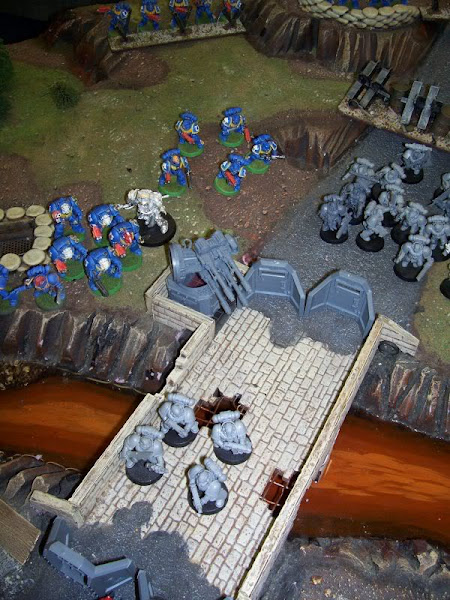
In the center, the two Ultramarine combat squads with heavy weapons and the Space Wolf squad now with one plasma gun stayed still to fire at the Hive Tyrant in the trench, again causing no wounds. The rest of the marines surged foward towards the objective. The combat squad farthest ahead ran onto and most of the way across the bridge. The Space Marines were now occupying the objective, but they would need to some how make sure there were no Tyranid models touching the bridge at the end of the game, and that one brave combat squad wouldn't be able to hold off the entire Tyranid army alone.

Meanwhile, all that really remained of the Space Marine right flank was the wounded Lone Wolf. Left unsupported, and thinking his wounds might prove to be fatal anyway, he plunged himself into combat with the swarm of Gargoyles and was promptly struck down in a blaze of glory (and bio-plasma).

Tyranid Turn 4
There were a lot of Space Marines bearing down on the bridge, and the Tyranids needed to keep them from getting to the far side of the bridge where they might be able to hold off the Tyranid counter-attack. The Hormagaunts were unable to move, as they had gone to ground again the previous turn when fired at by the Ultramarine Terminators. And they, naturally, where perfectly positioned to prevent the Carnifex from moving up to the bridge, or the Genestealers from coming out of their bastion. So it looked like it was time for the Hive Tyrant and his Tyrant Guard to come out of the trench that had protected them so well the entire battle. They moved onto the very end of the bridge, ready to charge into the courageous combat squad and slaughter them. In addition, the Ravenors in the rear bastion exited the building and took up position behind some trees, ready to advance if they were needed.

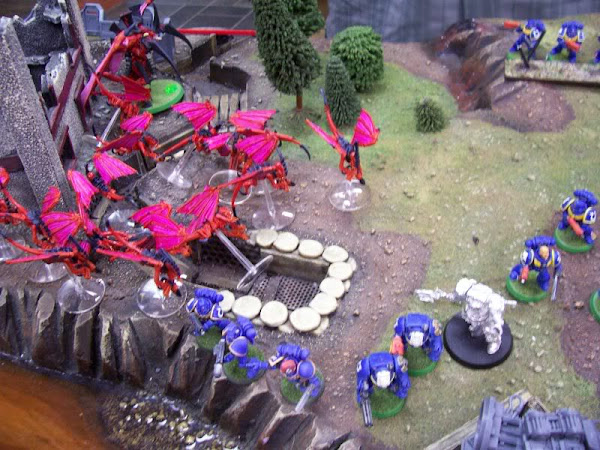
This turn also saw the arrival of more Tyranid reserves! Another Zoanthrope had managed to work its way around the rear of the Space Marine army to appear suddenly behind the Ultramarine Lascannon combat squad. The stealthy guy fired him warp blast at point blank range, and naturally missed them by a mile. At the same time, the flying Hive Tyrant and the Gargoyles once again flew at full speed towards the attacking Space Marines. Many of them had gotten close enough now so that their fleshborers were in range of the Ultramarine Terminators. They optimistically opened fire, and were rewarded as the burrowing worms shot from their weapons brought down three of the fearsome Terminators! That would turn out to be quite a blow to the Space Marines, as they could have really used those powerfists for taking down the Tyranid monstrous creatures. The remaining terminators just barely managed to pass their break test, having to endure the disturbing screams of their companions as their brains were devoured.

Back on the main bridge, the Hive Tyrant was about to charge into the combat squad and tear them to pieces, when shots rang out from the automated heavy bolters on the bastion to his rear. One of the Space Marines was killed by the automated weapons fire, requiring the squad to make a break test. As it turns out, Space Marines are now allowed to voluntarily fail any break tests, which they obviously chose to do in this case. They fell back to the far edge of the bridge, out of assault range of the very surprised Hive Tyrant. If only we could see the look on his face when that happened. Meanwhile, the Zoanthrope at the rear of the Space Marine lines charged into the combat squad with the lascannon, killing one of them. But, more importantly, he would tie them up for the rest of the game so they couldn't get any lascannon shots at the now exposed Hive Tyrant.


Space Marine Turn 5
An Ultramarine combat squad moved to their right to deal with the approaching Gargoyles. They took out several with their flamer before charging into close combat where they killed a few more. The Gargoyles were within Synapse Range of the flying Hive Tyrant, so they held. In the center, the large unit of Space Wolves with their commander, the remaining two Ultramarine Terminators, and the remains of the Ultramarine Combat Squad with the meltagun advanced onto the bridge. I just realized I haven't really mentioned that combat squad with the meltagun much. This is because, up to this point in the game, the meltagunner had spent the whole battle shooting at the closest bastion and missing. This turn he would change it up a bit and miss the Hive Tyrant instead.
The Terminator Librarian left the unit of Terminators, leaving them to take the lead. The other Space Wolf unit in the back stayed still, as did the Ultramarine unit with the Missile Launcher. The three remaning Ultramarines who were first on the bridge moved back up to fire on the Hive Tyrant at point blank range. Those were some brave Space Marines. Pretty much everything else in the area also fired on the Hive Tyrant and his two remaining Tyrant Guard. Up to this point, I don't think I had failed a single armor or cover save for them since the initial bombardment. Once they departed the safety of their trench, they apparently became much more vulnerable. The two Tyrant Guard were gunned down, with a wound left over for the Tyrant. The Hive Tyrant was now wounded and unguarded, but was the only Tyranid on the bridge, which was beginning to fill up with Space Marines.

Tyranid Turn 5
I don't appear to have any decent pictures of the 5th Tyranid turn for some reason. I guess the battle was getting too exciting to remember to stop and take pictures. But I think I can remember well enough what happened. The Flying Hive Tyrant couldn't bear to watch the Space Marines killing the little Gargoyles, so he charged in to save them, slaughtering the remaining marines. With their consolidate move, I once again failed to put some Gargoyles in front of the Hive Tyrant to screen him and give a cover save. When will I learn?
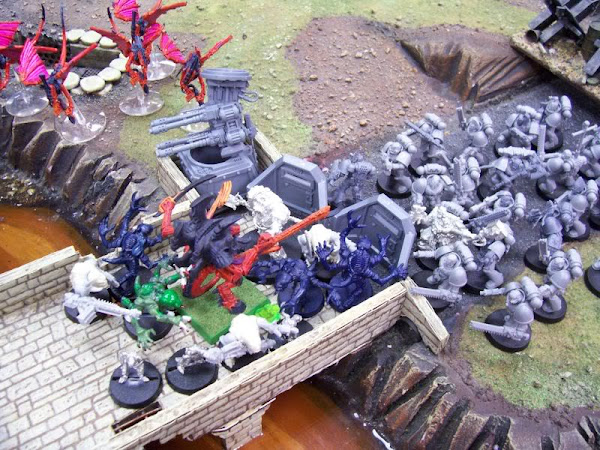
Once again, the defensive Heavy Bolters and Quad Autocannons blazed at the remaining three members of the Ultramarine combat squad that was farthest forward. They wouldn't be pulling their voluntary fallback trick this time, as all three of the brave Ultramarines were killed by the defensive fire. This left the Hive Tyrant on the bridge free to assault the two remaining Terminators. The Tyrant managed to kill them both before they could make use of their brutal Powerfists. He then used his consolidate move to get in the middle of the bridge, blocking off any Space Marines from being able to get around him. To capture the bridge, they would have to take down the Hive Tyrant.
Also not pictured, the Hormagaunts, having not been shot and and gone to ground in the previous turn, moved over to occupy the trenches that the Hive Tyrant and Tyrant Guard had been in. This left room for the close combat Carnifex to move up, though he isn't much of a runner and didn't make it to the bridge.
At the end of Turn 5 the roll was made to see if there would be a turn 6, and there was.
Space Marine Turn 6
The Space Marines figured they would need to kill both of the Hive Tyrants to make sure they could control the bridge. With one of them being completely in the open, most of the Space Marines fired on the flying Hive Tyrant, taking him down the the weight of fire, with the last wound coming from the Space Wolf Commander's plasma pistol. The Terminator Librarian hopped over the barricades onto the bridge, planning to take down the final Hive Tyrant with his force weapon.

The other unit of Space Wolves didn't end up needing to fire at the flying Hive Tyrant, so they instead decided to charge into combat with the Hive Tyrant on the bridge, bringing a powerfist and a lot of regular attacks to help out the Librarian. Unfortunately their difficult terrain woes continued, and they got tripped up attempting to hurdle the barricades and fell all over each other, dramatically failing to get into close combat.
So the Terminator Librarian would face the Hive Tyrant alone, but he did use his psychic powers to increase his strength. The Hive Tyrant went first, but only managed to would the Librarian once. The Tyrant's Lash Whips removed one of the Librarian's attacks, and only one attack hit, needing 4+ to wound. If successful, all it would take was an easy psychic test to kill the Hive Tyrant outright. The die was rolled, and failed to wound!
Tyranid Turn 6
Sensing the moment when the Space Marine attack was running out of steam, the Tyranids brought forward their reserves. The Hormagaunts moved further out of the way into the trenches, while the Carnifex and 6 Ravenors moved up to the bridge, and the unit of Genestealers exited the Bastion they were occupying and moved onto the bridge. There was no stopping them, as the Hive Tyrant has successfully kept the bridge clear of Space Marines except for the single Terminator Librarian he was in combat with. The Gargoyles flew out of the trenches to pounce on the three remaining Ultramarines from the meltagun combat squad.

This is just a picture of all my reserve units that never made an impact on the game because they had to move on from one of the short table edges, and had way too far to go to reach the bridge in the middle. A unit of 16 Guants, 10 Genestealers, and another Zoanthrope didn't see action because they started so far away.

The shooting from the Gargoyles wiped out the Ultramarine combat squad without the need to assault. In the assault phase, the Genestealers had room to charge the Terminator Librarian, and finished him off before he could have another chance to take down the Hive Tyrant. With their best chance of taking out the Tyranid monstrous creatures gone, no Terminators left, and only one powerfist in the Space Wolf unit, the remaining Space Marines would have a hard time taking the bridge.
At the end of Turn 6 we rolled to see if there would be a Turn 7, and there was not. By this point, the bridge appeared to be pretty solidly controlled by the Tyranids, anyway. With a Hive Tyrant, a Carnifex, a unit of Genestealers, and a unit of Ravenors that would all have to be wiped out to take control of the bridge, the Space Marine attackers saw that there was no hope of success. Cutting their losses, they withdrew. The bridge was denied them, and they would have to find another way to retake the Tyranid held portions of the planet that lie beyond the river.
No comments:
Post a Comment